

The Atlanta campaign was a series of battles fought in the Western Theater of the American Civil War throughout northwest Georgia and the area around Atlanta during the summer of 1864. Union Maj. Gen. William Tecumseh Sherman invaded Georgia from the vicinity of Chattanooga, Tennessee, beginning in May 1864, opposed by the Confederate general Joseph E. Johnston.
Johnston's Army of Tennessee withdrew toward Atlanta in the face of successive flanking maneuvers by Sherman's group of armies. In July, the Confederate president, Jefferson Davis, replaced Johnston with the more aggressive General John Bell Hood, who began challenging the Union Army in a series of costly frontal assaults. Hood's army was eventually besieged in Atlanta and the city fell on September 2, setting the stage for Sherman's March to the Sea and hastening the end of the war.
Background
Military situation
The Atlanta campaign followed the Union victory in the Battles for Chattanooga in November 1863; Chattanooga was known as the "Gateway to the South", and its capture opened that gateway. After Ulysses S. Grant was promoted to general-in-chief of all Union armies, he left his favorite subordinate from his time in command of the Western Theater, William T. Sherman, in charge of the Western armies. Grant's strategy was to apply pressure against the Confederacy in several coordinated offensives. While he, George G. Meade, Benjamin Butler, Franz Sigel, George Crook, and William W. Averell advanced in Virginia against Robert E. Lee, and Nathaniel Banks attempted to capture Mobile, Alabama, Sherman was assigned the mission of defeating Johnston's army, capturing Atlanta, and striking through Georgia and the Confederate heartland.
Opposing forces
Union
| Principal Union commanders |
|---|
|


At the start of the campaign, Sherman's Military Division of the Mississippi consisted of three armies:[5]
- Maj. Gen. James B. McPherson's Army of the Tennessee (Sherman's army under Grant in 1863), including the corps of Maj. Gen. John A. Logan (XV Corps), Maj. Gen. Grenville M. Dodge (XVI Corps), and Maj. Gen. Frank P. Blair, Jr. (XVII Corps). When McPherson was killed at the Battle of Atlanta, Maj. Gen. Oliver O. Howard replaced him.
- Maj. Gen. John M. Schofield's Army of the Ohio, consisting of Schofield's XXIII Corps and a cavalry division commanded by Maj. Gen. George Stoneman.
- Maj. Gen. George H. Thomas's Army of the Cumberland, including the corps of Maj. Gen. Oliver O. Howard (IV Corps), Maj. Gen. John M. Palmer (XIV Corps), Maj. Gen. Joseph Hooker (XX Corps), and Brig. Gen. Washington L. Elliott (Cavalry Corps). After Howard took army command, David S. Stanley took over IV Corps.
On paper at the beginning of the campaign, Sherman outnumbered Johnston 98,500 to 50,000,[5] but his ranks were initially depleted by many furloughed soldiers, and Johnston received 15,000 reinforcements from Alabama. However, by June, a steady stream of reinforcements brought Sherman's strength to 112,000.[6]
Confederate
| Principal Confederate commanders |
|---|
|


Opposing Sherman, the Army of Tennessee was commanded first by Gen. Joseph E. Johnston, who was relieved of his command in mid-campaign and replaced by Lt. Gen. John Bell Hood. The four corps in the 50,000-man army were commanded by:[5]
- Lt. Gen. William J. Hardee (divisions of Maj. Gens. Benjamin F. Cheatham, Patrick R. Cleburne, William H. T. Walker, and William B. Bate).
- Lt. Gen. John Bell Hood (divisions of Maj. Gens. Thomas C. Hindman, Carter L. Stevenson, and Alexander P. Stewart).
- Lt. Gen. Leonidas Polk (also called the Army of Mississippi, with the infantry divisions of Maj. Gen. William W. Loring, Samuel G. French, and Edward C. Walthall, and a cavalry division under Brig. Gen. William Hicks Jackson). When Polk was killed on June 14, Loring briefly took over as commander of the corps but was then replaced by Alexander P. Stewart on June 23.
- Maj. Gen. Joseph Wheeler (Cavalry corps, with the divisions of Maj. Gen. William T. Martin and Brig. Gens. John H. Kelly and William Y. C. Humes).
Johnston was a conservative general with a reputation for withdrawing his army before serious contact would result; this was certainly his pattern against George B. McClellan in the Peninsula Campaign of 1862. But in Georgia, he faced the much more aggressive Sherman. Johnston's army repeatedly took up strongly entrenched defensive positions in the campaign. Sherman prudently avoided suicidal frontal assaults against most of these positions, instead maneuvering in flanking marches around the defenses as he advanced from Chattanooga towards Atlanta. Whenever Sherman flanked the defensive lines (almost exclusively around Johnston's left flank), Johnston would retreat to another prepared position. Both armies took advantage of the railroads as supply lines, with Johnston shortening his supply lines as he drew closer to Atlanta, and Sherman lengthening his own.
Summary
| Date | Event |
|---|---|
May 1, 1864
|
Skirmish at Stone Church. |
May 2, 1864
|
Skirmish at Lee's Cross-Roads, near Tunnel Hill. |
| Skirmish near Ringgold Gap. | |
May 10, 1864
|
Skirmish at Catoosa Springs. |
| Skirmish at Red Clay. | |
| Skirmish at Chickamauga Creek. | |
May 4, 1864
|
Maj. Gen. Frank P. Blair, Jr., assumes command of the Seventeenth Army Corps. |
| Skirmish on the Varnell's Station Road. | |
May 5, 1864
|
Skirmish near Tunnel Hill. |
May 6–7, 1864
|
Skirmishes at Tunnel Hill. |
May 7, 1864
|
Skirmish at Varnell's Station. |
| Skirmish near Nickajack Gap. | |
May 8–11, 1864
|
Demonstration against Rocky Face Ridge, with combats at Buzzard Roost or Mill Creek Gap, and Dug Gap. |
May 8–13, 1864
|
Demonstration against Resaca, with combats at Snake Creek Gap, Sugar Valley, and near Resaca. |
May 9–13, 1864
|
Demonstration against Dalton, with combats near Varnell's Station (9th and 12th) and at Dalton (13th). |
May 13, 1864
|
Skirmish at Tilton. |
May 14–15, 1864
|
Battle of Resaca. |
May 15, 1864
|
Skirmish at Armuchee Creek. |
| Skirmish near Rome. | |
May 16, 1864
|
Skirmish near Calhoun. |
| Action at Rome (or Parker's) Cross-Roads. | |
| Skirmish at Floyd's Spring. | |
May 17, 1864
|
Engagement at Adairsville. |
| Action at Rome. | |
| Affair at Madison Station, Ala. | |
May 18, 1864
|
Skirmish at Pine Log Creek. |
May 18–19, 1864
|
Combats near Kingston. |
| Combats near Cassville. | |
May 20, 1864
|
Skirmish at Etowah River, near Cartersville. |
May 23, 1864
|
Action at Stilesborough. |
May 24, 1864
|
Skirmishes at Cass Station and Cassville. Skirmish at Burnt Hickory (or Huntsville). |
| Skirmish near Dallas. | |
May 25 – June 5, 1864
|
Operations on the line of Pumpkin Vine Creek, with combats at New Hope Church, Pickett's Mills, and other points. |
May 26 – June 1, 1864
|
Combats at and about Dallas. |
May 27, 1864
|
Skirmish at Pond Springs, Ala. |
May 29, 1864
|
Action at Moulton, Ala. |
June 9, 1864
|
Skirmishes near Big Shanty and near Stilesborough. |
June 10, 1864
|
Skirmish at Calhoun. |
June 10 – July 3, 1864
|
Operations about Marietta, with combats at Pine Hill, Lost Mountain, Brush Mountain, Gilgal Church, Noonday Creek, McAfee's Cross-Roads, Kennesaw Mountain, Powder Springs, Cheney's Farm, Kolb's Farm, Olley's Creek, Nicka-jack Creek, Noyes' Creek, and other points. Popular general Leonidas Polk killed. |
June 24, 1864
|
Action at La Fayette. |
June 27, 1864
|
Battle of Kennesaw Mountain |
July 4, 1864
|
Skirmishes at Ruff's Mill, Neal Dow Station, and Rottenwood Creek. |
July 5–17, 1864
|
Operations on the line of the Chattahoochee River, with skirmishes at Howell's, Turner's, and Pace's Ferries, Isham's Ford, and other points. |
July 10–22, 1864
|
Rousseau's Opelika Raid raid from Decatur, Ala., to the West Point and Montgomery Railroad, with skirmishes near Coosa River (13th), near Greenpoint and at Ten Island Ford (14th), near Auburn, Ala and near Chehaw, Ala (18th). |
July 18, 1864
|
Skirmish at Buck Head. |
| General John B. Hood, C. S. Army, supersedes General Joseph E. Johnston in command of the Army of Tennessee.
Confederate Army Command Changed | |
July 19, 1864
|
Skirmishes on Peachtree Creek. |
July 20, 1864
|
Battle of Peachtree Creek. |
July 21, 1864
|
Engagement at Bald (or Leggett's) Hill. |
July 22, 1864
|
Battle of Atlanta. |
| Maj. Gen. John A. Logan, U.S. Army, succeeds Maj. Gen. James B. McPherson in command of the Army of the Tennessee. | |
July 22–24, 1864
|
Garrard's raid to Covington. |
July 23, 1864
|
Brig. Gen.Morgan L. Smith, U.S. Army, in temporary command of the Fifteenth Army Corps. |
July 23 – August 25, 1864
|
Operations about Atlanta, including Battle of Ezra Church (July 28), assault at Utoy Creek (August 6), and other combats. |
July 24, 1864
|
Skirmish near Cartersville. |
July 27, 1864
|
Maj. Gen. Oliver O. Howard, U.S. Army, assumes command of the Army of the Tennessee. |
| Maj. Gen. John A. Logan, U.S. Army, resumes command of the Fifteenth Army Corps. | |
| Maj. Gen. David S. Stanley, U.S. Army, succeeds Maj. Gen. Oliver O. Howard in command of the Fourth Army Corps. | |
| Brig. Gen. Alpheus S. Williams, U.S. Army, succeeds Maj. Gen. Joseph Hooker in temporary command of the Twentieth Army Corps. | |
July 27–31, 1864
|
McCook's raid on the Atlanta and West Point and Macon and Western Railroads, with skirmishes near Campbellton (28th), near Lovejoy's Station (29th), at Clear Creek (30th), and action near Newnan (30th). |
| Garrard's raid to South River, with skirmishes at Snapfinger Creek (27th), Flat Rock Bridge and Lithonia (28th). | |
July 27 – August 6, 1864
|
Stoneman's raid to Macon, with combats at Macon and Clinton (July 30), Hillsborough (July 30–31), Mulberry Creek and Jug Tavern (August 8). |
July 30, 1864
|
Maj. Gen. Henry W. Slocum, U.S. Army, assigned to the command of the Twentieth Army Corps. |
August 7, 1864
|
Brig. Gen. Richard W. Johnson, U.S. Army, succeeds Maj. Gen. John M. Palmer in temporary command of the Fourteenth Army Corps. |
August 9, 1864
|
Bvt. Maj. Gen. Jefferson C. Davis, U.S. Army, assigned to the command of the Fourteenth Army Corps. |
August 10 – September 9, 1864
|
Wheeler's raid to North Georgia and East Tennessee, with combats at Dalton (August 14–15) and other points. |
August 15, 1864
|
Skirmishes at Sandtown and Fairburn. |
August 18–22, 1864
|
Kilpatrick's raid from Sandtown to Lovejoy's Station, with combats at Camp Creek (18th), Red Oak (19th), Flint River (19th), Jonesborough (19th), and Lovejoy's Station (20th). |
August 22, 1864
|
Bvt. Maj. Gen. Jefferson C. Davis, U.S. Army, assumes command of the Fourteenth Army Corps. |
August 26 – September 1, 1864
|
Operations at the Chattahoochee railroad bridge and at Pace's and Turner's Ferries, with skirmishes. |
August 27, 1864
|
Maj. Gen. Henry W. Slocum, U.S. Army, assumes command of the Twentieth Army Corps. |
August 29, 1864
|
Skirmish near Red Oak. |
August 30, 1864
|
Skirmish near East Point. |
| Action at Flint River Bridge. | |
August 31, 1864
|
Skirmish near Rough and Ready Station. |
August 31 – September 1, 1864
|
Battle of Jonesborough. |
September 2, 1864
|
Union occupation of Atlanta. |
September 2–5, 1864
|
Actions at Lovejoy's Station. |
Battles
Sherman vs. Johnston


Rocky Face Ridge (May 7–13, 1864)
Johnston had entrenched his army on the long, high mountain of Rocky Face Ridge and eastward across Crow Valley. Sherman had earlier decided to demonstrate against the strong Confederate position with the bulk of his force while he sent a smaller portion through Snake Creek Gap, to the right, to hit the Western & Atlantic Railroad at Resaca, Georgia. With sufficient men, the Union Army could cut off the Confederate lines of communication to the south and force Johnston to attack them or disperse his army traveling through the rough terrain to the east. The larger Union force engaged the enemy at Buzzard Roost (Mill Creek Gap) and at Dug Gap drawing away their attention. In the meantime, the third column, under McPherson, passed unnoticed through Snake Creek Gap and on May 9 advanced to the outskirts of Resaca, where it found a small Confederate force entrenched. Fearing defeat, McPherson pulled his column back to Snake Creek Gap, which Sherman's orders gave him authority to do. On May 10, Sherman decided to take most of his men and join McPherson to take Resaca. The next morning, as he discovered Sherman's army withdrawing from their positions in front of Rocky Face Ridge, Johnston retired south towards Resaca.[8] So began the first of a long series of flanking maneuvers by Sherman against Johnston; Sherman became so good at the tactic that his men boasted that Sherman "could flank the devil out of hell, if necessary." Johnston would be flanked out of every position he held until eventually relieved of command. The opportunity to destroy or disorganize the Confederates in the campaign's first battle, however, was missed.[9]
Resaca (May 13–15)
Union troops tested the Confederate lines around Resaca to pinpoint their whereabouts. Full scale fighting occurred on May 14, and the Union troops were generally repulsed except on Johnston's right flank, where Sherman did not fully exploit his advantage. On May 15, the battle continued with no advantage to either side until Sherman sent a force across the Oostanaula River at Lay's Ferry, towards Johnston's railroad supply line. Unable to halt this Union movement, Johnston was forced to retire.[10]
Adairsville (May 17)
Johnston's army retreated southward while Sherman pursued. Failing to find a good defensive position south of Calhoun, Johnston continued to Adairsville while the Confederate cavalry fought a skillful rearguard action. On May 17, Howard's IV Corps ran into entrenched infantry of Hardee's corps, while advancing about two miles (3.2 km) north of Adairsville. Three Union divisions prepared for battle, but Thomas halted them because of the approach of darkness. Sherman then concentrated his men in the Adairsville area to attack Johnston the next day. Johnston had originally expected to find a valley at Adairsville of suitable width to deploy his men and anchor his line with the flanks on hills, but the valley was too wide, so Johnston disengaged and withdrew.[11]
New Hope Church (May 25–26)
After Johnston retreated to Allatoona Pass from May 19 to 20, Sherman decided that attacking Johnston there would be too costly, so he determined to move around Johnston's left flank and steal a march toward Dallas. Johnston anticipated Sherman's move and met the Union forces at New Hope Church. Sherman mistakenly surmised that Johnston had a token force and ordered Hooker's XX Corps to attack. This corps was severely mauled. On May 26, both sides entrenched.[12]
Dallas (May 26 – June 1)
Sherman's army tested the Confederate line. On May 28, Hardee's corps probed the Union defensive line, held by Logan's XV Corps, to exploit any weakness or possible withdrawal. Fighting ensued at two different points, but the Confederates were repulsed, suffering high casualties. Sherman continued looking for a way around Johnston's line, and on June 1, his cavalry occupied Allatoona Pass, which had a railroad and would allow his men and supplies to reach him by train. Sherman abandoned his lines at Dallas on June 5 and moved toward the railhead at Allatoona Pass, forcing Johnston to follow soon afterward.[13]
Pickett's Mill (May 27)
After the Union defeat at New Hope Church, Sherman ordered Howard to attack Johnston's seemingly exposed right flank. The Confederates were ready for the attack, which did not unfold as planned because supporting troops never appeared. The Confederates repulsed the attack, causing high casualties.[14]
Operations around Marietta (June 9 – July 3)
When Sherman first found Johnston entrenched in the Marietta area on June 9, he began extending his lines beyond the Confederate lines, causing some Confederate withdrawal to new positions. On June 14, Lt. Gen. Leonidas Polk was killed by an artillery shell while scouting enemy positions with Hardee and Johnston and was temporarily replaced by Maj. Gen. William W. Loring. On June 18–19, Johnston, fearing envelopment, moved his army to a new, previously selected position astride Kennesaw Mountain, an entrenched arc-shaped line to the west of Marietta, to protect his supply line, the Western & Atlantic Railroad. Sherman made some unsuccessful attacks on this position but eventually extended the line on his right and forced Johnston to withdraw from the Marietta area on July 2–3.[15]
Kolb's Farm (June 22)
Having encountered entrenched Confederates astride Kennesaw Mountain stretching southward, Sherman fixed them in front and extended his right wing to envelop their flank and menace the railroad. Johnston countered by moving Hood's corps from the left flank to the right on June 22. Arriving in his new position at Mt. Zion Church, Hood decided on his own to attack. Warned of Hood's intentions, Union generals John Schofield and Joseph Hooker entrenched. Union artillery and swampy terrain thwarted Hood's attack and forced him to withdraw with heavy casualties. Although he was the victor, Sherman's attempts at envelopment had momentarily failed.[16]
Kennesaw Mountain (June 27)
This battle was a notable exception to Sherman's policy in the campaign of avoiding frontal assaults and moving around the enemy's left flank. Sherman was sure that Johnston had stretched his line on Kennesaw Mountain too thin and decided on a frontal attack with some diversions on the flanks. On the morning of June 27, Sherman sent his troops forward after an artillery bombardment. At first, they made some headway overrunning Confederate pickets south of the Burnt Hickory Road, but attacking an enemy that was dug in was futile. The fighting ended by noon, and Sherman suffered heavy casualties, about 3,000, compared with 1,000 for the Confederates.[17] Johnston fell back toward Smyrna on July 3 and by July 4 to a defensive line along the west bank of the Chattahoochee River that became known as Johnston's River Line.
Pace's Ferry (July 5)
Johnston put the Chattahoochee River between his army and Sherman's. General Howard's IV corps advanced on Pace's Ferry on the river. The Confederate pontoon bridge there was defended by dismounted cavalry. They were driven away by BG Thomas J. Wood's division of IV Corps. The bridge, although damaged, was captured. Howard decided not to force a crossing against increased Confederate opposition. When federal pontoons arrived on July 8, Howard crossed the river and outflanked the Pace's Ferry defenders. This forced them to withdraw; and this permitted Sherman to cross the river, advancing closer to Atlanta. Johnston abandoned the River Line and retired south of Peachtree Creek, about three miles (4.8 km) north of Atlanta.
Sherman vs. Hood
Due to public pressure, Confederate President Jefferson Davis had become increasingly irate at Johnston giving ground. Finally, on July 17, Davis stripped Johnston of command and replaced him with John Bell Hood. Hood may have seemed a more able commander than Johnston, especially on the attack, as seen at Gettysburg, but the Army of Tennessee was short on men, talent, and luck. Sherman had been frustrated by Johnston's defensive tactics and was reportedly pleased with the change as the aggressive Hood was more willing to do open battle, thus giving Sherman opportunities to use his superior numbers and firepower to destroy Confederate forces. [18]

Peachtree Creek (July 20)
After crossing the Chattahoochee, Sherman split his army into three columns for the assault on Atlanta with Thomas' Army of the Cumberland, on the left, moving from the north. Schofield and McPherson had drawn away to the east, leaving Thomas on his own. Johnston decided to attack Thomas as he crossed the creek, but Confederate President Jefferson Davis relieved him of command and appointed Hood to take his place. Hood adopted Johnston's plan and attacked Thomas after his army crossed Peachtree Creek. The determined assault threatened to overrun the Union troops at various locations, but eventually the Union held, and the Confederates fell back. The advance of McPherson from the east side of Atlanta distracted Hood from his offensive and drew off Confederate troops that might have joined the attack on Thomas.[19]
Atlanta (July 22)


Hood was determined to attack McPherson's Army of the Tennessee. He withdrew his main army at night from Atlanta's outer line to the inner line, enticing Sherman to follow. In the meantime, he sent William J. Hardee with his corps on a fifteen-mile (24 km) march to hit the unprotected Union left and rear, east of the city. Wheeler's cavalry was to operate farther out on Sherman's supply line, and Cheatham's corps was to attack the Union front. Hood, however, miscalculated the time necessary to make the march, and Hardee was unable to attack until afternoon. Although Hood had outmaneuvered Sherman for the time being, McPherson was concerned about his left flank and sent his reserves—Dodge's XVI Corps—to that location. Two of Hood's divisions ran into this reserve force and were repulsed. The Confederate attack stalled on the Union rear but began to roll up the left flank. Around the same time, a Confederate soldier shot and killed McPherson when he rode out to observe the fighting. Determined attacks continued, but the Union forces held. About 4 p.m., Cheatham's corps broke through the Union front, but massed artillery near Sherman's headquarters halted the Confederate assault. Logan's XV Corps then led a counterattack that restored the Union line. The Union troops held, and Hood suffered high casualties.[20]
Despite being called the Battle of Atlanta, the city itself would not fall until September.
Ezra Church (July 28)
Sherman's forces had previously approached Atlanta from the east and north and had not been able to break through, so Sherman decided to attack from the west. He ordered Howard's Army of the Tennessee to move from the left wing to the right and cut Hood's last railroad supply line between East Point and Atlanta. Hood foresaw such a maneuver and sent the two corps of Lt. Gen. Stephen D. Lee and Lt. Gen. Alexander P. Stewart to intercept and destroy the Union force at Ezra Church. Howard had anticipated such a thrust, entrenched one of his corps in the Confederates' path, and repulsed the determined attack, inflicting numerous casualties. Howard, however, failed to cut the railroad. Concurrent attempts by two columns of Union cavalry to cut the railroads south of Atlanta ended in failure, with one division under Maj. Gen. Edward M. McCook completely smashed at the Battle of Brown's Mill and the other force also repulsed and its commander, Maj. Gen. George Stoneman, taken prisoner.[21]
Utoy Creek (August 5–7)
After failing to envelop Hood's left flank at Ezra Church, Sherman still wanted to extend his right flank to hit the railroad between East Point and Atlanta. He transferred Schofield's Army of the Ohio from his left to his right flank and sent him to the north bank of Utoy Creek. Although Schofield's troops were at Utoy Creek on August 2, they, along with the XIV Corps, Army of the Cumberland, did not cross until August 4. Schofield's force began its movement to exploit this situation on the morning of August 5, which was initially successful. Schofield then had to regroup his forces, which took the rest of the day. The delay allowed the Confederates to strengthen their defenses with abatis, which slowed the Union attack when it restarted on the morning of August 6. The Federals were repulsed with heavy losses and failed in an attempt to break the railroad. On August 7, the Union troops moved toward the Confederate main line and entrenched. They remained there until late August.[22]
Dalton (August 14–15)
Wheeler and his cavalry raided into North Georgia to destroy railroad tracks and supplies. They approached Dalton in the late afternoon of August 14 and demanded the surrender of the garrison. The Union commander refused to surrender and fighting ensued. Greatly outnumbered, the Union garrison retired to fortifications on a hill outside the town where they successfully held out, although the attack continued until after midnight. Around 5 a.m. on August 15, Wheeler retired and became engaged with relieving infantry and cavalry under Maj. Gen. James B. Steedman's command. Eventually, Wheeler withdrew.[23]
Lovejoy's Station (August 20)
While Wheeler was absent raiding Union supply lines from North Georgia to East Tennessee, Sherman sent cavalry Brig. Gen. Judson Kilpatrick to raid Confederate supply lines. Leaving on August 18, Kilpatrick hit the Atlanta & West Point Railroad that evening, tearing up a small area of tracks. Next, he headed for Lovejoy's Station on the Macon & Western Railroad. In transit, on August 19, Kilpatrick's men hit the Jonesborough supply depot on the Macon & Western Railroad, burning great amounts of supplies. On August 20, they reached Lovejoy's Station and began their destruction. Confederate infantry (Patrick Cleburne's Division) appeared and the raiders were forced to fight into the night, finally fleeing to prevent encirclement. Although Kilpatrick had destroyed supplies and track at Lovejoy's Station, the railroad line was back in operation in two days.[24]
Jonesborough (August 31 – September 1)

In late August, Sherman determined that if he could cut Hood's railroad supply lines, the Confederates would have to evacuate Atlanta. Sherman had successfully cut Hood's supply lines in the past by sending out detachments of cavalry, but the Confederates quickly repaired the damage. He therefore decided to move six of his seven infantry corps against the supply lines. The army began pulling out of its positions on August 25 to hit the Macon & Western Railroad between Rough and Ready and Jonesborough. To counter the move, Hood sent Hardee with two corps to halt and possibly rout the Union troops, not realizing Sherman's army was there in force. On August 31, Hardee attacked two Union corps west of Jonesborough but was easily repulsed. Fearing an attack on Atlanta, Hood withdrew one corps from Hardee's force that night. The next day, a Union corps broke through Hardee's line, and his troops retreated to Lovejoy's Station. Sherman had cut Hood's supply line but he had failed to destroy Hardee's command.[25]
Fall of Atlanta (September 2)
On the night of September 1, Hood evacuated Atlanta and ordered that the 81 rail cars filled with ammunition and other military supplies be destroyed. The resulting fire and explosions were heard for miles.[N 1] Union troops under the command of Gen. Henry W. Slocum occupied Atlanta on September 2.[26]
On September 4, General Sherman issued Special Field Order #64. General Sherman announced to his troops that "The army having accomplished its undertaking in the complete reduction and occupation of Atlanta will occupy the place and the country near it until a new campaign is planned in concert with the other grand armies of the United States."[27]
Aftermath

Sherman was victorious, and Hood established a reputation as the most recklessly aggressive general in the Confederate Army. Casualties for the campaign were roughly equal in absolute numbers: 31,687 Union (4,423 killed, 22,822 wounded, 4,442 missing/captured) and 34,979 Confederate (3,044 killed, 18,952 wounded, 12,983 missing/captured). But this represented a much higher Confederate proportional loss. Hood's army left the area with approximately 30,000 men, whereas Sherman retained 81,000.[28][29] Sherman's victory was qualified because it did not fulfill the original mission of the campaign—destroy the Army of Tennessee—and Sherman has been criticized for allowing his opponent to escape. However, the capture of Atlanta made an enormous contribution to Union morale and was an important factor in the re-election of President Abraham Lincoln.
Sherman realized that garrisoning Atlanta long-term would be a waste of troops, and that eventually the city would need to be abandoned.[30] But first the army needed to be replenished, and so Sherman occupied Atlanta for the time being. Though the city was already mostly empty, about 1,600 civilians remained (compared to about 10,000 before the war[31]) and Sherman felt their presence would be an obstacle. So, on September 14 Sherman issued Special Field Orders No. 67, which demanded the evacuation of the civilian population.[30][32]
Hood, though he had been unable to hold Atlanta, now planned a counter-action. But the details were divulged in a speech given by Confederate President Davis, which provided Sherman a clear view of Hood's strategy. Sherman left Atlanta garrisoned with only a single Corps, and took the rest of the army to chase down Hood in the Franklin–Nashville campaign. Despite the divulging of Hood's plans, Hood was able to seize the initiative, briefly drawing Sherman north from Atlanta. The chase lasted through November, before Sherman returned the army to Atlanta to prepare for the March to the Sea. Despite Hood and Sherman's armies being the main forces in the western theater, they would not meet again, and Hood's army would be effectively destroyed by George Henry Thomas instead.[33] Sherman's Army returned to Atlanta on November 12, spending just a few days to destroy anything of military value, including the railroads. Sherman's move was to be an evolution in warfare: without railroads for supply, the Army would have to live off the land. The Army withdrew from Atlanta on November 15, and so began Sherman's March to the Sea.[34]
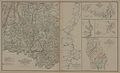
Additional battle maps
Gallery: the Atlanta Campaign from the Atlas to Accompany the Official Records of the Union and Confederate Armies.
-
 Map 1:
Sherman's advance: Tennessee, Georgia and Carolinas (1863–65). -
 Map 2:
Atlanta Campaign: First epoch. -
 Map 3:
Atlanta Campaign: Second epoch. -
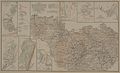 Map 3:
Atlanta Campaign: Third epoch. -
 Maps 4-5:
Atlanta Campaign: Fourth and Fifth epoch. -
 Map 6:
Atlanta Campaign: Siege of Atlanta.


Gallery: Additional maps.
-
 Map 1:
The Atlanta Campaign from Dalton to Kennesaw Mountain (May 7 – July 2, 1864). -
 Map 2:
Battle of Kennesaw Mountain, June 27, 1864. -
 Map 3:
A sketch of the Battle of Peachtree Creek, July 20, 1864. -
 Map 3:
A sketch of the Battle of Atlanta, July 22, 1864. -
 Maps 4-5:
A sketch of the Battle of Ezra Church, July 28, 1864.


See also
- Armies in the American Civil War
- Atlanta in the Civil War
- List of costliest American Civil War land battles
- Troop engagements of the American Civil War, 1864
Notes
Notes
- ^ Destruction of the Ordnance train and the Rolling Mill were dramatized in the 1939 film Gone with the Wind. Eyewitness accounts do not indicate that the fire spread beyond the rail yard.
Citations
- ^ Further information: Official Records, Series I, Volume XXXVIII, Part 1, pages 89–114
- ^ Further information: Official Records, Series I, Volume XXXVIII, Part 3, pages 638–675
- ^ Effective strength of the army under Maj. Gen. W. T. Sherman, during the campaign against Atlanta, Ga., 1864: Official Records, Series I, Volume XXXVIII, Part 1, pages 115–117
- ^ Strength of the confederate forces: Official Records, Series I, Volume XXXVIII, Part 3, pages 675–683
- ^ a b c Eicher, p. 696
- ^ McKay, p. 129.
- ^ OR Series 1, Volume 38 (Part I), pp. 52–54
- ^ NPS, Rocky Face Ridge Archived December 3, 2009, at the Wayback Machine
- ^ Barrett 1956, p. 18.
- ^ NPS, Resaca Archived April 2, 2010, at the Wayback Machine
- ^ NPS, Adairsville Archived December 3, 2012, at the Wayback Machine
- ^ NPS, New Hope Church Archived January 15, 2010, at the Wayback Machine
- ^ NPS, Dallas Archived August 25, 2009, at the Wayback Machine
- ^ NPS, Pickett's Mill Archived September 24, 2008, at the Wayback Machine
- ^ NPS, Marietta Archived January 15, 2010, at the Wayback Machine
- ^ NPS, Kolb's Farm Archived January 9, 2010, at the Wayback Machine
- ^ "Battle Summary: Kennesaw Mountain, GA". The American Battlefield Protection Program. National Park Service. Archived from the original on June 3, 2008.
- ^ Barrett 1956, p. 19.
- ^ NPS, Peachtree Creek Archived January 9, 2010, at the Wayback Machine
- ^ NPS, Atlanta Archived October 19, 2013, at the Wayback Machine
- ^ NPS, Ezra Church Archived January 15, 2010, at the Wayback Machine
- ^ NPS, Utoy Creek
- ^ NPS, Dalton II
- ^ NPS, Lovejoy's Station Archived October 4, 2009, at the Wayback Machine
- ^ [1] NPS, Jonesborough
- ^ Garrett, Atlanta and Environs, pp 433–634
- ^ [2] O.R. Series 1 – Volume 38 (Part V) p 801
- ^ McKay, p. 146
- ^ Foote, p. 529.
- ^ a b Barrett 1956, p. 20.
- ^ "1860 US Census: Atlanta" (PDF).
- ^ Garrett 1954, p. 640-643.
- ^ Barrett 1956, p. 22-23.
- ^ Barrett 1956, p. 23-24.
References
- Barrett, John Gilchrist (1956). Sherman's march through the Carolinas (1 ed.). Chapel Hill. ISBN 978-1-4696-1112-9. OCLC 864900203.
{{cite book}}: CS1 maint: location missing publisher (link) - Bonds, Russell S. War Like the Thunderbolt: The Battle and Burning of Atlanta. Yardley, PA: Westholme Publishing, 2009. ISBN 978-1-59416-100-1.
- Castel, Albert. Decision in the West: The Atlanta Campaign of 1864. Lawrence: University Press of Kansas, 1992. ISBN 978-0-7006-0748-8.
- Eicher, David J. The Longest Night: A Military History of the Civil War. New York: Simon & Schuster, 2001. ISBN 0-684-84944-5.
- Esposito, Vincent J. West Point Atlas of The Civil War. New York: Frederick A. Praeger, 1962. OCLC 19943283. Library of Congress Catalog Card Number 62-18682. The same with minor changes as Esposito, Vincent J. West Point Atlas of American Wars, volume 1. New York: Frederick A. Praeger, 1959.
- Foote, Shelby. The Civil War: A Narrative. Vol. 3, Red River to Appomattox. New York: Random House, 1974. ISBN 0-394-74913-8.
- Garrett, Franklin M. (1954). Atlanta and Environs, A Chronicle of its People and Events. Lewis Historical Publishing, Inc. ISBN 978-0820309132.
- Kennedy, Frances H., ed. The Civil War Battlefield Guide. 2nd ed. Boston: Houghton Mifflin Co., 1998. ISBN 0-395-74012-6.
- McDonough, James Lee, and James Pickett Jones. War so Terrible: Sherman and Atlanta. New York: W. W. Norton & Co., 1987, ISBN 0-393-02497-0.
- McKay, John E. "Atlanta Campaign." In Encyclopedia of the American Civil War: A Political, Social, and Military History, edited by David S. Heidler and Jeanne T. Heidler. New York: W. W. Norton & Company, 2000. ISBN 0-393-04758-X.
- Welcher, Frank J. The Union Army, 1861–1865 Organization and Operations. Vol. 2, The Western Theater. Bloomington: Indiana University Press, 1993. ISBN 0-253-36454-X.
- National Park Service battle descriptions
 This article incorporates public domain material from websites or documents of the National Park Service.
Memoirs and primary sources
- Sherman, William T., Memoirs of General W.T. Sherman, 2nd ed., D. Appleton & Co., 1913 (1889). Reprinted by the Library of America, 1990, ISBN 978-0-940450-65-3.
- U.S. War Department, The War of the Rebellion: a Compilation of the Official Records of the Union and Confederate Armies. Washington, DC: U.S. Government Printing Office, 1880–1901.
Further reading
- Bailey, Anne J. The Chessboard of War: Sherman and Hood in the Atlanta Campaign of 1864. (University of Nebraska Press, 2000). ISBN 978-0-8032-1273-2.
- Davis, Stephen. A Long and Bloody Task: The Atlanta Campaign from Dalton through Kennesaw Mountain to the Chattahoochee River, May 5 – July 18, 1864. Emerging Civil War Series. El Dorado Hills, CA: Savas Beatie, 2016. ISBN 978-1-61121-317-1.
- Davis, Stephen. All the Fighting They Want: The Atlanta Campaign from Peachtree Creek to the City's Surrender, July 18 – September 2, 1864. Emerging Civil War Series. El Dorado Hills, CA: Savas Beatie, 2017. ISBN 978-1-61121-319-5.
- Evans, David. Sherman's Horsemen: Union Cavalry Operations in the Atlanta Campaign. (Indiana University Press, 1996). ISBN 0-253-32963-9.
- Hess, Earl J. Kennesaw Mountain: Sherman, Johnston and the Atlanta Campaign. (University of North Carolina Press, 2013). ISBN 978-1-4696-0211-0.
- Hood, Stephen M. John Bell Hood: The Rise, Fall, and Resurrection of a Confederate General. El Dorado Hills, CA: Savas Beatie, 2013. ISBN 978-1-61121-140-5.
- Jenkins Sr., Robert D. To the Gates of Atlanta: From Kennesaw Mountain to Peach Tree Creek, July 1–19, 1864 (Mercer University Press, 2015) xxiv, 378 pp.
- Jenkins Sr., Robert D. The Cassville Affairs: Johnson, Hood, and the Failed Confederate Strategy in The Atlanta Campaign, 19 May 1864. (Mercer University Press, 2024)
- Luvaas, Jay, and Harold W. Nelson, eds. Guide to the Atlanta Campaign: Rocky Face Ridge to Kennesaw Mountain. (University Press of Kansas, 2008). ISBN 978-0-7006-1570-4.
- Savas, Theodore P., and David A. Woodbury, eds. The Campaign for Atlanta & Sherman's March to the Sea: Essays on the American Civil War in Georgia, 1864. 2 vols. Campbell, CA: Savas Woodbury, 1994. ISBN 978-1-882810-26-0.
External links
- West Point Atlas Atlanta Campaign maps, May 4 – July 8
- West Point Atlas Atlanta Campaign maps, July 20 – September 3
- Operation Reports – Series 1, Volume XXXVIII – part 1 – Summary of the Principal Events, pp 52–54
- Animated History of the Atlanta Campaign
- The Civil War in Georgia as told by its historic markers – Engagement at Bald (or Leggett's) Hill July 21, 1863
- Who Burned Atlanta?
- Atlanta as Left by Our Troops
- Fort X
| 1861 |
| ||||
|---|---|---|---|---|---|
| 1862 |
| ||||
| 1863 |
| ||||
| 1864 |
| ||||
| 1865 |
| ||||
| Armies | |||||
| 1861 | |
|---|---|
| 1862 | |
| 1863 | |
| 1864 |
|
| 1865 | |
| Units | |
| Places | |